Last Updated on

Every blogger has a different process and a different way of publishing their posts, but there are 8 things that you should make sure you are doing before your final draft goes live!
Proofread
It goes without saying that you should proofread your content before you hit publish. I know this can seem like tedious, but there are a few tools that help proofread (beyond the basic spell check) and will help speed up the proofreading process!
Grammarly is my favorite editing app. You simply copy and paste your text into the editor and Grammarly will make basic grammar suggestions for you. If you feel you need even more help, you can upgrade to one of the paid plans and Grammarly will help you with the tone of your writing and much, much more.
Compress Your Images
To keep your blog from running slow, you should always compress your images. Images straight from your camera or found on stock websites are too big to be uploading to your blog (plus, you don’t need them to be that big anyway).
First, I always look at the dimensions of the image I am including in my blog. If it’s one I’ve downloaded from a stock photography website it’s usually unnecessarily big (your imagery does not need to be over 4,000 pixels wide for your blog).
To resize the image smaller, you can either use Photoshop, or you can use a free website like BeFunky. I find that sizing images down to anything less than 1,000 pixels wide is usually good enough.
Once your image is a smaller size, you still need to compress it.
When you compress your images, you are making the file size smaller without affecting the quality on the image!
An easy way to compress your images is to use TinyPNG. You simply need to drag and drop your image onto the screen and download the final file.
Your images are now the proper size to upload to your blog so your blog doesn’t load slow!
Optimize Your Images For SEO
Now that your images are ready to be added in your blog posts, you are going to want to do two more things to them:
- add keywords in the image name
- write alt text
Keywords are often overlooked in image file names, but are still important! For example, if your blog post is about summer dresses, your image name could be “summer-dresses.jpg”.
Pro Tip: When naming your images, you need to use a hyphen in between words. Do not name your image “summerdresses.jpg” because then Google won’t be able to read it.
Next, you need to write an SEO-friendly alt description for all your images.
The alt description is a piece of text that is shown in two different situations:
- when your image doesn’t load properly, your alt text will be shown instead
- when someone who has a visual impairment visits your website, your alt text will be read to them
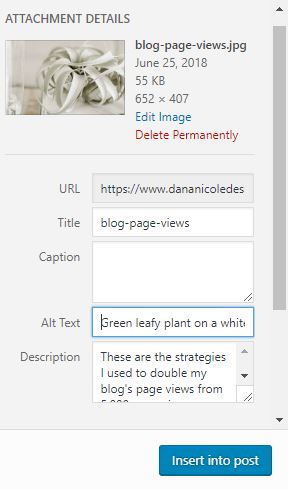
In WordPress, you can write the alt description for your images right in the media uploader:

The alt description should be a description of your image. For the image above, it was a photo of a plant so my alt text described the plant.
If possible, try to incorporate keywords into your alt text, but as the purpose of this text is to help visually impaired users, what’s most important is that you describe what the photo is about and not stuff with keywords.
Write Meta Data
The meta data is what appears in Google when your content shows up in search!

It’s important to have compelling and click-worthy meta data as it will increase the number of people who click on your content in the search results.
Good meta data tells the user what your blog post is about and incites curiosity to make them want to click over to read more.

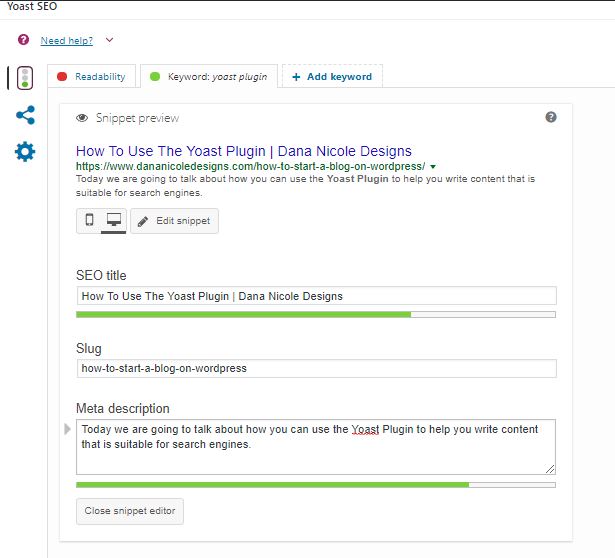
You can easily update your meta data for each page and post, install the Yoast Plugin. Below is a screenshot of what the Yoast Plugin looks like:
Include a Call-To-Action (CTA)
Every blog needs a call-to-action or something that makes the user take action.
Various CTAs can include:
- having users sign up for your email list
- having users complete a purchase
- having users leave a comment
- having users share your content
If you don’t explicitly tell your users/readers what you’d like them to do, they likely won’t know! You can make your CTA nice and clear by saying something like “download your free guide to SEO keywords!“. A clear and concise CTA can help increase your conversion rates and sales.
Write A Compelling Title
The best time to write your blog’s title is after you’ve written your blog post! Once it’s been written, you know exactly what the content is about and you can then create a catchy and compelling title. For example, this post could have been something like “Good things to do before you publish your blog”.
That is pretty boring (#justsayin’).
Instead, try and incorporate strong adjectives. Examples of weak adjectives would be ones like “good” or “bad”. They just don’t elicit much emotions.
Instead, something like “Do These 5 Things Before You Publish Your Blog Post!” is much better and will certainly have a higher number of people wanting to read it!
A great tool to help with titles is Title Capitalization for all of you who get confused with which words need to be capitalized.
Adjust The Format
Did you know your blog should have a certain format to keep readers engaged?
Yup! The readability of your blog is super important.
For SEO purposes, you need to have heading in your blog (like this one has) to divide up the content. This makes it much easier for people who are trying to scan your content quickly.
You should also try and incorporate:
- bulleted lists like this one
- bolded text
- italicized text
- images
- shorter paragraphs as they are easier to read
Interlink Your Posts
Lastly, you’ll want to do a bit of deep linking. Deep linking is when you link to a specific page or page on your website, rather than just linking to the homepage.
Linking to related content from your pages is good for a couple different reasons.
First, it helps to decrease your bounce rate (the percentage of people who leave your site after being on only one page) because you will be providing them with related content to keep reading.
Second, it helps Google and other search engines understand what your content is about so you can improve your rankings.
Notice how throughout this post I linked to other blog posts of mine that were related? Go ahead and click on some of the links to see how I did that so you can get some ideas for deep linking within your own content!
Are there other things you do before you hit publish that weren’t mentioned? Let me know below!
This article may include affiliate links. As an Amazon Associate I earn from qualifying purchases.

Dana Nicole is an award-winning freelance writer for MarTech/SaaS who was rated one of the best SaaS writers by Software World. She specializes in writing engaging content that ranks high in search engines and has been featured in publications like Semrush, ConvertKit, and Hotjar.
Dana holds a Bachelor’s degree in Business Administration and has over 15 years of experience working alongside national brands in their marketing departments.
When Dana’s not working, you can find her dancing en pointe, cooking up new recipes, and exploring the great outdoors with her two big dogs.


These are really great tips! Publishing a content is really crucial. It has to be helpful to the readers and perfect. This list will surely help a lot of content creators like me. Thank you! 🙂
Hi Dana, I’m just jumping into the world of blogging and I really appreciated your post! I haven’t really been using alt text yet, so that is a technique I will try out soon. I need to go back and add some deep links and be better with CTAs
Your blog is beautiful!
Hey Rachel! I’m glad you found this post useful! And congrats on your new blog; the beginning is always an exciting (and sometimes overwhelming) time, but it’s worth the ride 🙂 I’m happy we’ve got the chance to connect here!
Thank you for the information. In all the pins I have seen for starting your own blog, not one had any of this information. Yours was concise and contained information actually useful in starting a blog.
I’m glad you found it useful Chris! Thanks for stopping by